Learn to customize your own blog with confidence

Code it Pretty is an archive of tutorials from 2012-2015. Tutorial details may be outdated. More Info

Showing posts with label social media. Show all posts

Make Your Own Tweetable Links for Blogger

DIY Tweet This links for Blogger

"Tweet This" links make it easy for your readers to share your posts on Twitter. And, with a little bit of code, it's pretty easy to make any text on your blog tweetable! Today I'm going to give you the tools to make click-to-Tweet links of your own.

What the Code Does

After a one-time setup, this code lets you make any sentence in your post tweetable in a few seconds. A link to your blog post is automatically added to the end of the Tweet. Here's a demo link, styled to match my blog with optional CSS I've included at the end of the tutorial:

I'm learning how to make click to Tweet links on #Blogger from @MMosley

The colors and Twitter icon are part of the CSS styling, and you can change them to suit your blog's style, or create a completely different design.

Compatibility

This works with all of the standard Blogger templates except Dynamic Views, which does not accept customization. This will also work with custom templates that have the same internal structure as a standard template.

For best results, make sure timestamp links are enabled for your blog (here's how to check). If you have timestamp links enabled, the tweet will include a link to your blog post at the end. If you don't, the tweet will link to the page your reader was on when they clicked the link. Often that's ok, but if your reader tweets from from your home page or an index page, visitors who click the link in the tweet may not end up on the right post.

All set? Let's get started!

Add the Twitter Code

If you already have the official Twitter timeline widget installed on your blog you can skip this step.

Twitter has a code snippet that makes your tweet links open a new, small Twitter window, like this:

To install it: first, back up your template (instructions here). Do not skip the backup.

Next, open your template by clicking the "Edit HTML" button below your "Live On Blog" screenshot.

Then, open your template's search box by placing your cursor over the code, clicking once, and pressing CTRL and F at the same time (PC) or Command and F (Mac).

Enter </body> in the search box, then press enter. The code will "jump" to the </body> tag in your template and highlight it in yellow.

Paste the following line of code immediately above the </body> tag:

<script type="text/javascript" src="//platform.twitter.com/widgets.js"></script>

Then, press the orange "Save Template" button. Nothing will change on your blog yet — that comes later!

Add the HTML/JavaScript Gadget

Now, let's add the jQuery that makes your links tweetable!

Go to Layout and click an "Add a Gadget" space.

Select HTML/JavaScript from the popup menu and insert the following code into the gadget:

Save the gadget. Nothing will change on your blog yet, but it will after the next step.

Make Tweetable Links

Now that you have the code installed, you can make any text on your blog a tweetable link! Make sure to pick sentences that are 117 characters or less to leave room for the link to your post at the end of the tweet.

To make text tweetable, switch to the HTML view of your post and find the text you want to twitterize.

Wrap the text in <p></p> paragraph tags, like this:

<p>This is my tweetable text. Click to tweet it!</p>

Then, add the class of "tweetable" to the opening paragraph tag, like this:

<p class="tweetable">This is my tweetable text. Click to tweet it!</p>

You can use blockquote or span elements if you prefer, but I'm using the paragraph element here because it's a good fit for most blogs.

Save your post and check it out on your blog. Your text is now tweetable! Click it and see how it works.

Style Your Tweetable Links

At this point your link will just look like a regular link — but you want it to stand out, right? That's where CSS comes in.

I put an editable demo of a styled "tweetable" link on Codepen. You can play with it to customize the colors and styling.

Note: the "tweetable" link inside the demo won't open a new window when you click it because it's hosted on Codepen. Don't worry, that's just a Codepen thing — the code from this tutorial will open a new window on Blogger.

<div class="post-outer">
  <a href="http://www.codeitpretty.com" class="timestamp-link"></a>
<p class="tweetable">I'm learning how to make tweetable links for #Blogger from @codeitpretty!</p>
</div>


See the Pen 6b71bca216f2c7eb6ed8c85e246cd482 by mariemosley (@mariemosley) on CodePen

When you have it styled the way you like it, copy everything in the CSS tab and paste it into your blog's CSS field (Template > Customize > Advanced > Add CSS). Press the orange "Apply to Blog" button to save your changes. Now all of your tweetable links will have style!
Ombre Social Media Buttons - The HTML and CSS

ombre-inspired social media buttons with HTML and CSS, a step-by-step tutorial

Now that you've found the RGB value of your favorite color and , you're all set to start building your social media menu!

If you're already comfortable with HTML & CSS, you can jump straight to the code on Codepen. Otherwise, follow along :)

Getting Started

I'm going to show you how to build this social media menu in Mozilla Thimble, a free, web-based HTML & CSS editor. Thimble is awesome because it gives you a live preview of your project as you type in the HTML and CSS. And, it gives you hints to help you catch and prevent errors, so it's helpful for beginners.

To use Thimble, go to thimble.webmaker.org and press the "Start from Scratch" button.

mozilla thimble homepage

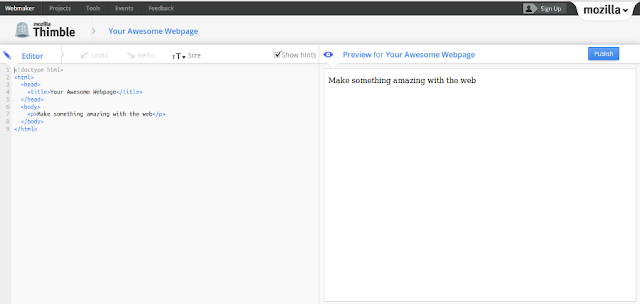
On the next page, you'll see that the screen is split in half, with an Editor pane on the left and a Preview pane on the right.

blank mozilla thimble editor

Delete the "<p>Make something amazing with the web</p>" paragraph and get ready to start writing the HTML for your social media menu!

The HTML

We're going to make an unordered list out of your social media links.

An unordered list is a bullet-point list. We start an unordered list with a <ul> tag and close it with a </ul> tag. UL stands for "Unordered List". We're going to give our social media links list the class of "ombre-social-media" so we can apply CSS styling to it later. So, in your Thimble editor, between the <body> </body> tags, type in:

<ul class="ombre-social-media">
</ul>

Each list item within this unordered list is a link wrapped in <li> tags. LI stands for "List Item".

We're going to give each list item a class named after the social media network the list item represents. So, for example, let's say you're starting your social media menu with a link to your Twitter account. You'd mark it up like this:

 <ul class="ombre-social-media">
     <li class="twitter-soc"><a href="http://www.twitter.com/codeitpretty">Twitter</a></li>
    </ul>

See the class "twitter-soc"? Later when you add the CSS, you'll give the Twitter link its own unique background color by referencing the twitter-soc class.

The <a href="http://www.twitter.com/codeitpretty">Twitter</a> segment of the list item is a link to Twitter. The word "Twitter" between the angle brackets is the clickable link to Twitter.

Using the Twitter example above as a template, keep adding new list items between the <ul></ul> tags until you've added all of your social media links. When you're done, you'll have markup that looks something like this:

<ul class="ombre-social-media">
     <li class="twitter-soc"><a href="http://www.twitter.com/codeitpretty">Twitter</a></li>
     <li class="googleplus-soc"><a href="https://plus.google.com/105816937910419028289">Google+</a></li>
     <li class="pinterest-soc"><a href="http://www.codeitpretty.com/pinterest">Pinterest</a></li>
     <li class="tumblr-soc"><a href="http://codeitpretty.tumblr.com">Tumblr</a></li>
   <li class="bloglovin-soc"><a href="http://www.bloglovin.com/blog/3590598/code-it-pretty">Bloglovin'</a></li>
     <li class="email-soc"><a href="mailto:marie@codeitpretty.com">Email</a></li>
     <li class="rss-soc"><a href="http://www.codeitpretty.com/feeds/posts/default">RSS</a></li>
    </ul>

And, in the Preview pane, you'll have a list of links that looks like this:

unstyled social media links

Not exactly glamorous, I know. That's what CSS is for!

The CSS

Now we're going to add some CSS to your Thimble. To do that, find the </title> tag up top, and add <style> </style> tags right beneath it, like this:

style tags in head of HTML document on Mozilla Thimble

All of the CSS that follows goes in-between those style tags.

Laying Out the Menu

First, we'll set style rules for the entire menu. Here we'll remove the bullet points on the link list. We're also setting the width of the menu, centering the text, and specifying the font style, weight, and size. Enter this between the <style></style> tags:

.ombre-social-media {
        padding: 0;
        list-style: none;
        width: 150px;
        text-align: center;
        font-family: 'YOUR FONT NAME', sans-serif;
        font-weight: 400;
        font-size: 24px;
      }

Replace 'YOUR FONT NAME' with the font you chose in . I'm using Raleway. I set a sans-serif fallback font, but you can change that to serif if you'd prefer. You can also change the menu width, font weight, and font size if you'd like. Here's what your preview pane will look like if you're using the same font as me:

CSS step one demonstration

Next, we're going to remove the underline under the social media links and give them a bit of padding so they're not so close together. Enter this directly below the closing curly brace } of the first piece of CSS:

.ombre-social-media a {
        text-decoration: none;
        display: block;
        color: black;
        padding: .1em 0 .15em 0;
      }

We just set the color of the text to black temporarily, so you can see the text while you work. We'll change that later once everything's in place. Your Preview pane should now look like this:

css step two

So, in the first step, we removed the underline on the social media links. But, wouldn't it be nice if the links were underlined when your users hover over them? I think so! Here's how to set that up. Add this below the closing curly brace of the 2nd CSS segment:

 .ombre-social-media a:hover {
        text-decoration: underline; 
      }

While we're at it, let's set a :focus style for your readers who use keyboard navigation. This styling will outline and underline your links when they're targeted with the tab key on your reader's keyboard.

      .ombre-social-media a:focus {
        outline: 1px dotted gray;  
        text-decoration: underline; 
        overflow: hidden;    
      }

After you've added those two CSS rules, hover your cursor over one of the links and you'll see the underline reappear. Move your cursor away and it disappears again.

hovered link states
Setting the Background Colors

OK, we've got the rough outline of a social media menu, but there's no ombre effect yet! Here's where your RGB color and your individual classes for each list item come into play.

To create the ombre effect, we're going to set the background color for each of the social media links. Let's start at the top. My first link goes to Twitter, so here's how I'd style that link.

.twitter-soc {
        background-color: rgba(136, 87, 119, .3);
      }

Replace .twitter-soc with the class you set for your first social media link, and replace the first three numbers in the parentheses after rgba with your chosen color's rgb value. I used the rgb value for my favorite shade of purple and set the last number to .3, for 30% opacity, but you can start lower or higher if you'd like. Opacity ranges from .1 (10% opacity) to 1 (100% opacity), so use that range as a guide for determining where to start.

To keep the ombre effect going, add background color styling for your next social media link and give it slightly higher opacity. For example, I styled the next three links like this:

 .googleplus-soc {
        background-color: rgba(136, 87, 119, .4);
      }
.pinterest-soc {
        background-color: rgba(136, 87, 119, .5);
      }
.tumblr-soc {
        background-color: rgba(136, 87, 119, .6);
      }

Keep going, increasing opacity as you go, until you've added all of your social media links, and your menu looks like this:

menu at the next to last stage

Now that you've filled in the background for all of the links, you can change the text color to something else if you'd like. To do that, go back to the .ombre-social-media a styling and change the color: rule to another color. I went with white.

Adding the Menu to Your Blog

So now you've got a beautiful social media menu working on Thimble, but you still need to move it onto your blog! Here's how:

Adding the menu to Blogger

Copy and paste the HTML portion of your social media menu (everything between the <body> </body> tags) into an HTML/JavaScript gadget on your blog. Save the gadget.

Then, copy and paste all of the CSS (everything between the <style></style> tags) into the template designer by going to Template > Customize > Advanced > Add CSS.

Press the "apply to blog" button to apply your styling to the menu. You should see the styled menu appear in the preview screen below.

Adding the menu to self-hosted Wordpress

Copy and paste the HTML portion of your social media menu (everything between the <body> </body> tags) into an Text widget on your blog. Save the widget

Then, copy and paste all of the CSS (everything between the <style></style> tags). If you're using a child theme for your blog, add the CSS to your child theme's style.css file. If you're not using a child theme, you can use Jetpack's "Custom CSS" feature to add the CSS to your blog.

Adding the menu to Typepad

Go to Content > Widgets > Embed Your Own HTML and press "add this module". Copy and paste the HTML portion of your social media menu (everything between the <body> </body> tags) into the new HTML module. Then, copy and paste all of the CSS (everything between the <style></style> tags) into your Custom CSS field by going to Blogs > Design > Custom CSS. Press "Preview" to preview the changes, then press "Save Changes" to apply them to your live blog.

How To Install Google Web Fonts on Your Blog

This is part two of my , but these instructions work for anyone who'd like to install Google Web Fonts on Blogger, self-hosted WordPress, or Typepad.

Google Web Fonts are free, easy to install, and lovely. Let's check them out!

Browse Google Web Fonts

Here's the fun part! To browse the Google Fonts library, go to: www.google.com/webfonts.

There's over 600 fonts in the collection right now, and they keep adding more, so you'll want to sort them.

From the menus on the left, you can organize the fonts by style. Up top, you can enter your own text in the "Preview Text" field. If you're following along with the social media menu tutorial, enter the names of your social media services so you can see how they'll look in your menu.

Options for sorting the fonts by name, date added, number of styles, and popularity are also at the top of the screen.

If you're going to use a combination of fonts for your project, or if you'd like to preview multiple font sizes at once, check out my buddy Chip Cullen's Font Combinator for expanded Google Fonts browsing.

Install Your Google Web Font

Once you've decided on your favorite font, it's time to install!

Google Web Fonts on Self-Hosted WordPress

There are two ways to install Google Web Fonts in self-hosted WordPress. You can either use a font management plugin, or add the font to your theme manually. If you'd like to go the plugin route, WP Google Fonts has you covered.

If you'd like to add the font manually there's a great tutorial at WP Beginner.

Installing on Blogger or Typepad

The first few steps for installing Google Web Fonts on Blogger or Typepad are the same.

To get started, click the "Quick Use" button to install a single font, or the "Add to Collection" button to select more than one font. If you're using a collection, press the "Use" button at the bottom of the screen after you've added all of your fonts to your collection.

On the next screen, if the font you've chosen has multiple styles, you'll be asked to choose the styles you want.

If you're only going to use the font for one part of your blog — for example, if you're choosing a font exclusively for your social media menu — you should select only the style you plan to use for your design. If you'd like to use the font throughout your blog, choose a normal, bold, and italic style if they're offered.

After you've made your style selections, scroll down and you'll be asked to choose a character set.

For many fonts, the selection is grayed out on the only available character set — Latin. The Latin character set is used in English and European languages. You may also see an option for "Latin Extended" — only choose this if your language includes accented letters.

After you've made your selections, it's time to install your font!

Installing Google Web Fonts on Blogger

To install your font on Blogger, first back up your template. To do that, go to "Template" and click the "Backup/Restore" button in the upper right. Save the resulting .xml file.

After you've backed up your template, copy the Google Web Fonts code from the "Standard" tab.

Next, open your template by going to Template > Edit HTML.

Hover your cursor over your code, click once, then press CTRL and F at the same time (PC) or Command & F (Mac) to open a search box inside the template. Type <b:skin> in the search box and press enter. Your template code will jump down to the <b:skin> tag and highlight it in yellow.

Paste the Google Web Fonts standard code directly above the <b:skin> tag. Then, enter a trailing slash (/) right before the closing angle bracket (>) of the web fonts code, like this:

If you chose to add the Latin Extended version of your font, change any ampersands (&) in your font link to &amp; so they will encode properly.

Press the "Save Template" button and you're all set!

Installing Google Web Fonts on Typepad

Typepad users should copy the @import code option for Google Web Fonts.

Go to to Design > Content and click the pencil icon on your Navigation Bar.

Paste the code into your navigation bar module, and wrap it in <style> tags, like so:

<style>
@import url(http://fonts.googleapis.com/css?family=FONTNAME);
</style>

Press the "OK" button at the bottom of the navigation bar module to save your update.

Test Your Installation

Once you have your font installed, you should check to make sure it's working. You can quickly test your font by adding an HTML widget/gadget to your blog with a span style that uses your new font. Here's how:

In self-hosted WordPress, open a new Text widget. In Blogger, use a new HTML/JavaScript gadget. In Typepad, go to Content > Widgets > Embed Your Own HTML and press "add this module".

Enter this into your new widget/gadget:

<span style="font-family: 'Font Name Here';">Testing custom font</span>

Replace 'Font Name Here' with the name of the Google Web Font you chose. Save your gadget/widget and check out your blog. You should see "Testing custom font" in the font of your choice. Good job! You can delete the test widget now.

What's Next?

If you're following along with the , you're ready to use your RGB color and your favorite font to make a stylish social media menu! Move on to Part Three: .

If you want to learn how to use your new font for another part of your blog, check out the Blog Font Style with CSS tutorial series.

Ombre Social Media Buttons with HTML and CSS

ombre-inspired social media buttons with HTML and CSS, a step-by-step tutorial

Ah, ombre! I see this "dip dye" style everywhere, from cakes to dresses to hairstyles, and I think it makes a beautiful backdrop for a simple set of social media links.

In this three-part tutorial, I'll take you step-by-step through the entire process of creating an "ombre" social media menu for your blog with HTML and CSS. And I really do mean step-by-step; you don't have to know anything about HTML or CSS to use this tutorial.

If this is your first time digging into HTML & CSS, just take it slow and you'll learn a lot :) If you're comfortable with HTML and CSS already, you can jump straight to the source code on CodePen.

What You'll Make

In this tutorial series, you'll learn to make a layered "ombre" social media menu to place in your blog's sidebar or footer. You can a see demo on CodePen.

plain HTML transformed with CSS

You'll choose your own colors, fonts, and social media services to make the menu your own. But, if you'd like to use the same colors and fonts as me, I don't mind sharing!

What You Need

All you need to use this tutorial is:

  • A blog with the option to add sidebar or footer gadgets/widgets
  • The option to add custom CSS to your blog.

Blogger, self-hosted Wordpress, and Typepad Unlimited users, you're are all set!

What You'll Learn In Part One

  • How to find the RGB value of your favorite color.

What You'll Learn in Part Two

  • How to select & use a free web font from Google's vast font library.

What You'll Learn in Part Three

  • How to make a list of links using an HTML unordered list.
  • How to position and style your social media menu with CSS.
  • How to vary color opacity with CSS.

Ready to pick a color? Let's get to it!

Find Your Color Value

This ombre color effect is created by varying the opacity of a single color, starting from a low opacity and graduating up to full (or almost full) opacity. So, to get started, all you need to do is select one color.

To vary the opacity of the color, we'll need to find its RGB value. RGB is a color model designed to display colors on electronic screens — RGB stands for Red, Green, Blue.

If you have Photoshop, GIMP, or another image editing tool, you can grab the RGB value with the eyedropper tool. If you don't have image editing software, there are three ways to get the RGB value of a color online.

Pull the Color from an Image

To get your RGB color from an image, use Adobe's Kuler. You'll need to sign up for a free Adobe account to use Kuler (if you don't have one already). Once you've signed up, you can upload an image and select up to five colors from the image.

After you've made your color selections, save the color theme (you can save it publicly or privately). Once the theme is saved, you can access it under Mykuler > Themes. Select your color theme, then click the "sliders" icon at the right to go into the theme editor.

On the next screen, copy the RGB value for the color you'd like to use on your social media menu (click to enlarge the pic).

Pull the Color from a Website

If you use Firefox or Chrome, you can use Colorzilla to pick a color from a page on the web. Make sure to set the "Auto Copy" setting to "rgb" to pick the RGB value of your color.

HEX to RGB

If you already know the HEX number of your color, you can pop it into this online Hex-to-RGB converter.

The Next Step

Now that you know the RGB value of your favorite color, you're ready to .

Readers' Buttons

I have a little gallery of readers' buttons on my Google+ page. Check them out for color & font inspiration!

Readers Ask: How I Set Up My Social Media Buttons

how I set up my social media buttons

I've had several readers ask how I made my social media buttons line up vertically like they do in the sidebar to the right.

The answer is: HTML & CSS! But, there's a bit more to the answer than just those acronyms, so let me show you how it's done.

What You'll Learn

How to make your social media icons line up vertically in a sidebar. If you'd like to take a sneak peek at the HTML & CSS we're going to use, you can see an interactive demo on Codepen.

What You Need To Use This Tutorial

You need a blog that allows you to add custom HTML widgets/gadgets in the sidebar. Blogger, self-hosted Wordpress, and Typepad Unlimited users, you're all set.

You also need a set of social media icons. The buttons in the screenshot above are from Brandi Girl Blog. My current buttons are from Icomoon. There are also many free and premium options out there. The HTML I'll give in this tutorial is suitable for any icon set.

First, Upload Your Icons

If you use Blogger, you can upload your icons to your Picasa Web Album for your blog. If you're on self-hosted Wordpress, upload your icons to your media library. Typepad users can upload images to the File Manager. No matter what platform you're on, if you prefer to use Photobucket or another image hosting service, you can!

Once you've uploaded your images, you can start putting together the HTML for your buttons.

Next, Write the HTML

You can use my Codepen demo as a template, or you can write out your HTML on your own.

Before you start writing your HTML, make sure you have a suitable text editorNotepad is built-in on PCs, TextEdit is built-in on Macs. Do not write HTML with word processing software.

For each of your social media buttons, you're going to use the same few lines of HTML. Here's the skeleton of one button's HTML:

<a href="" title=""><img src="" width="" height="" alt=""></a>

If you're familiar with HTML, you'll recognize that as the HTML to create a clickable image. If you're not familiar with HTML, let me break down each part so you know what goes where.

<a href=""

Your social media link goes here. For example, if I'm creating a button for Twitter, I'd fill it in as: <a href="http://www.twitter.com/MMosley".

An email link is slightly different. To link to email, fill it in like this:

<a href="mailto:marie@codeitpretty.com"

title="">

Enter the name of the social media service you're linking to here. To continue the Twitter example, I'd enter it like this: title="Twitter">. The text you enter here will show when your visitors hover over your social media button.

<img src=""

Here you'll enter the direct link to your social media button image. If you uploaded it to your Picasa album, click on the image in your album to reach its full-sized version, and right click on the image to copy its location. If you're on self-hosted Wordpress, you can get the link by clicking "edit" beneath your image in your media library and copying the File URL. Typepad users, you can find the direct URL to each image by right clicking its title your File Manager.

width="" height="" alt=""

Here you'll enter your images' width, height, and alternative text. I'd fill it in like this for my Twitter button: width="52" height="52" alt="Twitter icon".

After everything's filled in, the element closes with a </a> tag.

Putting it All Together

Now that I've broken the HTML down to bits, let's put it back together so you can see what the complete HTML for a social media button looks like:

<a href="http://www.twitter.com/MMosley" title="Twitter">
<img src="http://www.example.com/twitter.png" width="52" height="52" alt="Twitter icon"></a>

Repeat that process for each of your social media buttons until you've marked up each one. Then, paste your HTML into a sidebar widget. On Blogger, use an HTML/JavaScript gadget. On Wordpress, enter it in a text widget. On Typepad, use the "Embed your own HTML" option in your Content menu.

Make the Buttons Vertical

Depending on the size of your buttons and the width of your sidebar, your buttons may already be vertical. In that case, you're done. Congrats & enjoy your buttons!

But, if your buttons are displaying horizontally, you'll need to take another step to get them lined up properly.

Go into your sidebar widget and add this line at the very top of the HTML:

<div class="social-sidebar-buttons">

Then, scroll down to the very bottom of your HTML and add this line:

</div>

You've just wrapped your HTML in a div! A div is like a container for HTML — when you apply CSS to a div, it affects the entire container. We're going to use CSS to line up your buttons vertically.

Adding the CSS

Now that your HTML is all wrapped up, you just need to add a bit of CSS to force your social media buttons into line. If you're on Blogger, go to Template > Customize > Advanced > Add CSS. If you're on Typepad, go to Design > Custom CSS. On Wordpress your custom CSS location will vary. If you're using Jetpack's Custom CSS option, it's under Appearance > Edit CSS.

Once you've found the spot for your CSS, enter this into the custom CSS field:

.social-sidebar-buttons {
width: XXpx;
}

Replace XX with your buttons' width. This makes the div "container" that's holding your buttons contract to the width of your buttons, forcing all of the buttons into a vertical line. Save your CSS to apply it to your blog.

Further Customization

You may need to tweak the left or right margin of your social-sidebar-buttons div to get it into exactly the right spot in your sidebar. You can add a margin to your div's CSS like this:

.social-sidebar-buttons {
width: XXpx;
margin-left: XXpx;
}

If you want a right margin instead, enter margin-right instead of margin-left. Replace XX with the number of pixels you'd like to move your buttons — start small, then increase as needed.

Twitter Cards for Blogger

This post is outdated. Twitter cards and Blogger have both changed since this was posted in 2012. I recommend this tutorial from my friends at Blogger Xpertise for current Twitter card markup.

Have you noticed lately that some Tweets have a little something extra? Like my Tweets, for example?

These "expandable" Tweets are enhanced with the new Twitter Cards. Twitter Cards show more detail about your posts to give readers a little preview of what they'll see when they click your link. And, the cards work when anyone Tweets a link to your post — not just you. So, if someone else Tweets a link to your blog post, their Tweet will have all the preview details, too!

Today I'm going to share the exact markup I used and the steps I took to get Twitter Cards working for me on Blogger.

Before we get started, there are a few things you should know about Twitter Cards:

There are Three Types of Twitter Cards

In this tutorial I'm going to focus on making a summary card. Summary cards show the title of your blog post, a thumbnail image, a short description of your post, and your Twitter handle. The other two card types — photo and player — are not included in this tutorial, but you can learn more about them from the official Twitter Cards documentation.

Twitter Cards are a New Feature

Twitter added this feature in June, so it's still quite new. Like most new things, these cards are a little quirky. Not everyone will see the cards all of the time or on every browser/mobile platform. Twitter knows this and they're working on it.

They Don't Work Instantly

You have to add the Twitter cards markup to your template, then submit your blog to Twitter for acceptance. After you submit your blog you'll have to wait an unspecified period of time until the cards activate. Some people get an email from Twitter when their cards start working, others don't. I didn't; I just happened to notice that my cards were working about 2 weeks after I submitted my application.

Note: The Dynamic Views template behaves unpredictably if you alter its meta tags. If you'd like to use Twitter cards for your blog, choose a different Blogger template.

As long as you're cool with those caveats, we can get into how to set up Twitter Cards on Blogger!

Step One: Get Your Blog Posts Ready for Twitter Cards

Twitter Cards use your post's Search Description as your summary, so you'll want to make sure that you've filled it in on each post. I posted an in-depth tutorial on how to enable and use the Search Description feature in this post: All About Blogger Search Features.

Step Two: Back Up Your Template

Do not skip this step. You're going to add the Twitter Cards markup directly to your template, so before we do anything else you need to back that template up! Go to "Template" and click the "Backup/Restore" button in the upper right corner. On the next screen, click "Download full template" and save the .xml file. If anything goes wrong while you're adding the Twitter Cards markup you can restore your blog with your backup file.

Step Three: Add the Twitter Cards Markup

Now that you've backed up your template (you did that, right?), click the "Edit HTML" button beneath your "Live on blog" screenshot.

Once you've opened up your template, place your cursor over the code and click once. Open a search box by pressing ctrl-f if you're on a PC, or command-f if you're on a Mac. Type </head> in the search box that appears in the upper right corner of your template code, then press enter. Your template will jump to the </head> tag and highlight the tag in yellow.

Enter this markup directly above the </head> tag:

Before you save your template, change YOUR-TWITTER-NAME to your actual Twitter name.

Once you've done that, click the "Save template" button.

Step Four: Test Your Markup

Twitter has a testing tool for checking your Twitter Card markup here.

On the tester page, enter the URL of one of your posts (NOT your home page, Twitter Cards only work on post pages) and click "Preview Card". You'll see a demo Tweet with your card attached.

Step Five: Submit Your Twitter Cards Application

Once you've confirmed that your markup is working, you'll need to submit your blog for approval. To get started, click the "apply to participate" link on this page (3rd paragraph). When Twitter gets your application, they'll check your markup and approve you (provided everything is in the right place). They may contact you to let you know you've been approved, or you may just suddenly see your cards working, like I did. I don't know what happens if you don't get approved — probably nothing.

Twitter Cards Support

You can find out more about how the cards work and the different types of options available in the official documentation for Twitter Cards. If you have questions, you may also be able to get help on Twitter's developer forum, which has an active Twitter Cards board.